Show User Library Mac High Sierra
- Dec 20, 2018 How-To Show Your User Library in macOS Mojave, High Sierra and Sierra By Elizabeth Jones 13 comments Last updated December 20, 2018 Recently I needed to look at some of my user library files on my iMac and my MacBook, and I thought it would be easy-peasy to check them all out at once by showing the library folder.
- How to show user’s hidden /Library folder in macOS and access Library files? Last Updated on January 30th, 2019 by App Shah Leave a comment.
- Mac High Sierra Download
- Show User Library Mac High Sierra 10 13
- Show Library Folder Mac High Sierra
- Mac El Capitan
Mac High Sierra Download
Of the many files and folders that make up macOS Sierra, there’s probably none so important to maintaining the “personality” of your Mac than the ~/Library folder. Inside this folder are many subfolders that contain preference lists (“plists”), database files storing a variety of important information, and many other files that maintain the state of macOS and of the individual apps that run on a Mac. Thanks to the importance of this folder, it’s normally hidden from view. Today we’ll show you a few ways to view the ~/Library folder.
2017-10-29.sigh. How do I permanently show the Library folder in High Sierra? I go there often enough I want it up all the time. There used to be a UNIX command to undo this 'feature' but it doesn't seem to work anymore. I know about the view menu with the option held, but that's a pain. I know enough not to mess with what I don't know and I'm an adult.
Warning: Don’t play with the ~/Library folder if you don’t need to!
Before we go any further, it’s time for a warning. Don’t throw away or change anything in the ~/Library folder unless you know what you’re doing. Deleting individual files or folders found within ~/Library can cause individual applications or the operating system to malfunction.
When would you want to poke around in ~/Library? Perhaps you’re gaining knowledge about macOS as a developer and want to know how the operating system stores information. Maybe you want to clean out the remnants of an app that you haven’t had on your Mac for several years. In any case, it’s best to remember what your parents told you when you were a kid and were in a place filled with expensive and breakable things — “Look, but don’t touch!”
Method One: Our Friend, the Option Key
The first and easiest way is to use a trick that gives many of the items in the macOS menu bar “super powers” — hold down the Option key while clicking on a menu. In this case, Option-clicking the Go menu in the Finder adds a new menu item — Library — that opens the ~/Library folder (see image below):
As you can see from the image above, holding down the Option key while clicking on the Go menu in the Finder adds one item as seen on the right — the Library folder. Select that menu item and a window similar to the one seen below opens on the Mac screen:
Of these folders, Application Support is quite critical as it holds information for the current user’s apps. You’ll see many “.plist” files; these are XML (Extensible Markup Language) files that can be viewed on the Mac by simply highlighting the file and pressing the space bar to bring up a Quick Look. There are also a number of log files (text-based), temporary files, app plugins, and database files (.db or .sqlite) that are critical to storing settings and data in your favorite apps.
 Mar 18, 2020 Follow these steps to use the Photos library repair tool: Hold down the Option and Command keys while you open Photos on your Mac.
Method Two: Command-Shift-Period
The second method works from any open Finder window, and it uses the keyboard shortcut Command-Shift-. (that dot indicates the period key). This is a fun command, as it makes any hidden files or folders visible in the Finder. On the left in the image below you see my Home folder. Pressing Command-Shift-. makes hidden folders and files appear as shaded icons, shown on the right:
Pressing Command-Shift-Period makes hidden files and folders visible (right image)
Show User Library Mac High Sierra 10 13
See that Library folder in the center of the list on the right? Even though it is shaded, it can be double-clicked to open and view everything that’s in the folder. What’s more, some of the files that are not visible in the ~/Library folder when using Method One appear when using Method 2.


One other thing to note: Command-Shift-. makes these files and folders visible until the next time you use the command or reboot the Mac. If you’re poking around in the ~/Library folder on a Mac that other people may use without having their own logins, be sure to press Command-Shift-. one more time to set things back to hidden once you’re done. Note that Command-Shift-. also makes Library visible in the Finder Go menu without having to press the Option key…
Just remember, anything you change or delete in the ~/Library folder can affect how your Mac or individual applications work, so use these methods to just view hidden files or folders. Don’t delete the files or folders in ~/Library unless you know what you’re doing.
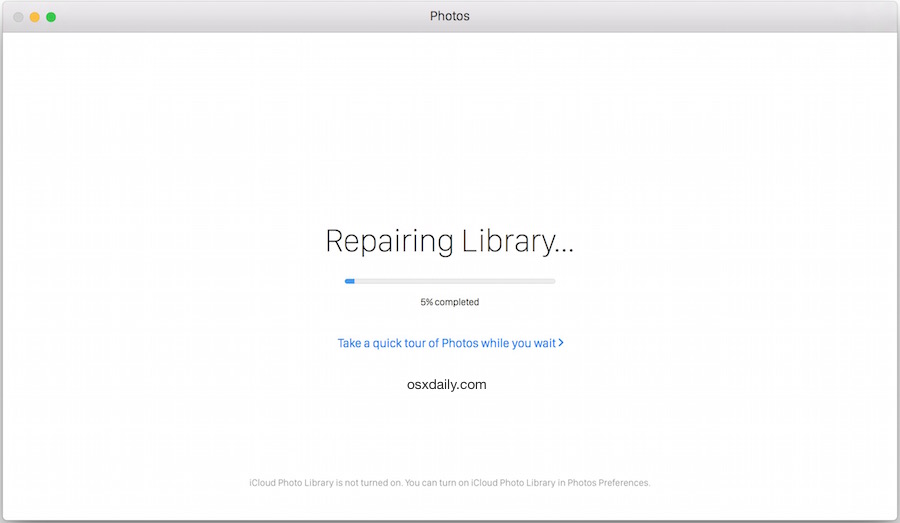
Follow these steps to use the Photos library repair tool:
- Hold down the Option and Command keys while you open Photos on your Mac.
- In the dialog that appears, click Repair to start the repair process.
You might be asked to type in your user account password to authorize the library repair.
Show Library Folder Mac High Sierra
The repair tool analyzes the the library's database and repairs any inconsistencies it detects. Depending on the size of your library, this might take some time. When the process is completed, Photos opens the library.
Mac El Capitan
If you repair a library that's automatically updated with iCloud Photos, the entire contents of the library re-updates with iCloud after the repair process completes.